

Planning & Implementing a Bridge with Young Students
The Bridge is one part of a biliteracy unit. It is the part of the biliteracy unit where students have the opportunity to reflect on their learning as they generate a meaningful text that is subsequently used to develop metalinguistic awareness.
The Process of Planning a Bridge
I begin the process of planning a Bridge by considering what students might say when I ask them what they have learned during a unit. This includes the words and phrases I have identified as key vocabulary and language targets in the first section of the BUF, but also considers the activities we will do and the language that may arise organically during those activities. I think it is important to consider the non-academic or non-technical words students may generate as they express their understanding of a concept. Although I always aim to teach my students the academic language that they need to be successful in school in both languages, I also embrace the informal language they suggest because that language may prove a rich source for comparing and contrasting the two languages.

After I have a robust list of possibilities in the language the unit was taught in, I consider how my students may translate these words or phrases. This is an interesting exercise because I am never sure what academic vocabulary my students will have in English or what English words they will use instead of the academic vocabulary. Although Bridges can be done from Spanish to English or English to Spanish, in my context I teach most units in Spanish and then Bridge to English because our language plan in kindergarten is 80% Spanish and 20% English. Sometimes students will know English words because the field trip that served as the concrete activity to begin the unit was conducted in English. Sometimes, students have had experience with the topic during preschool in English. Despite all of this uncertainty, considering how students will translate the words is an important step in the planning process. Without it, I cannot effectively accomplish the next step in the process where I do my own contrastive analysis.
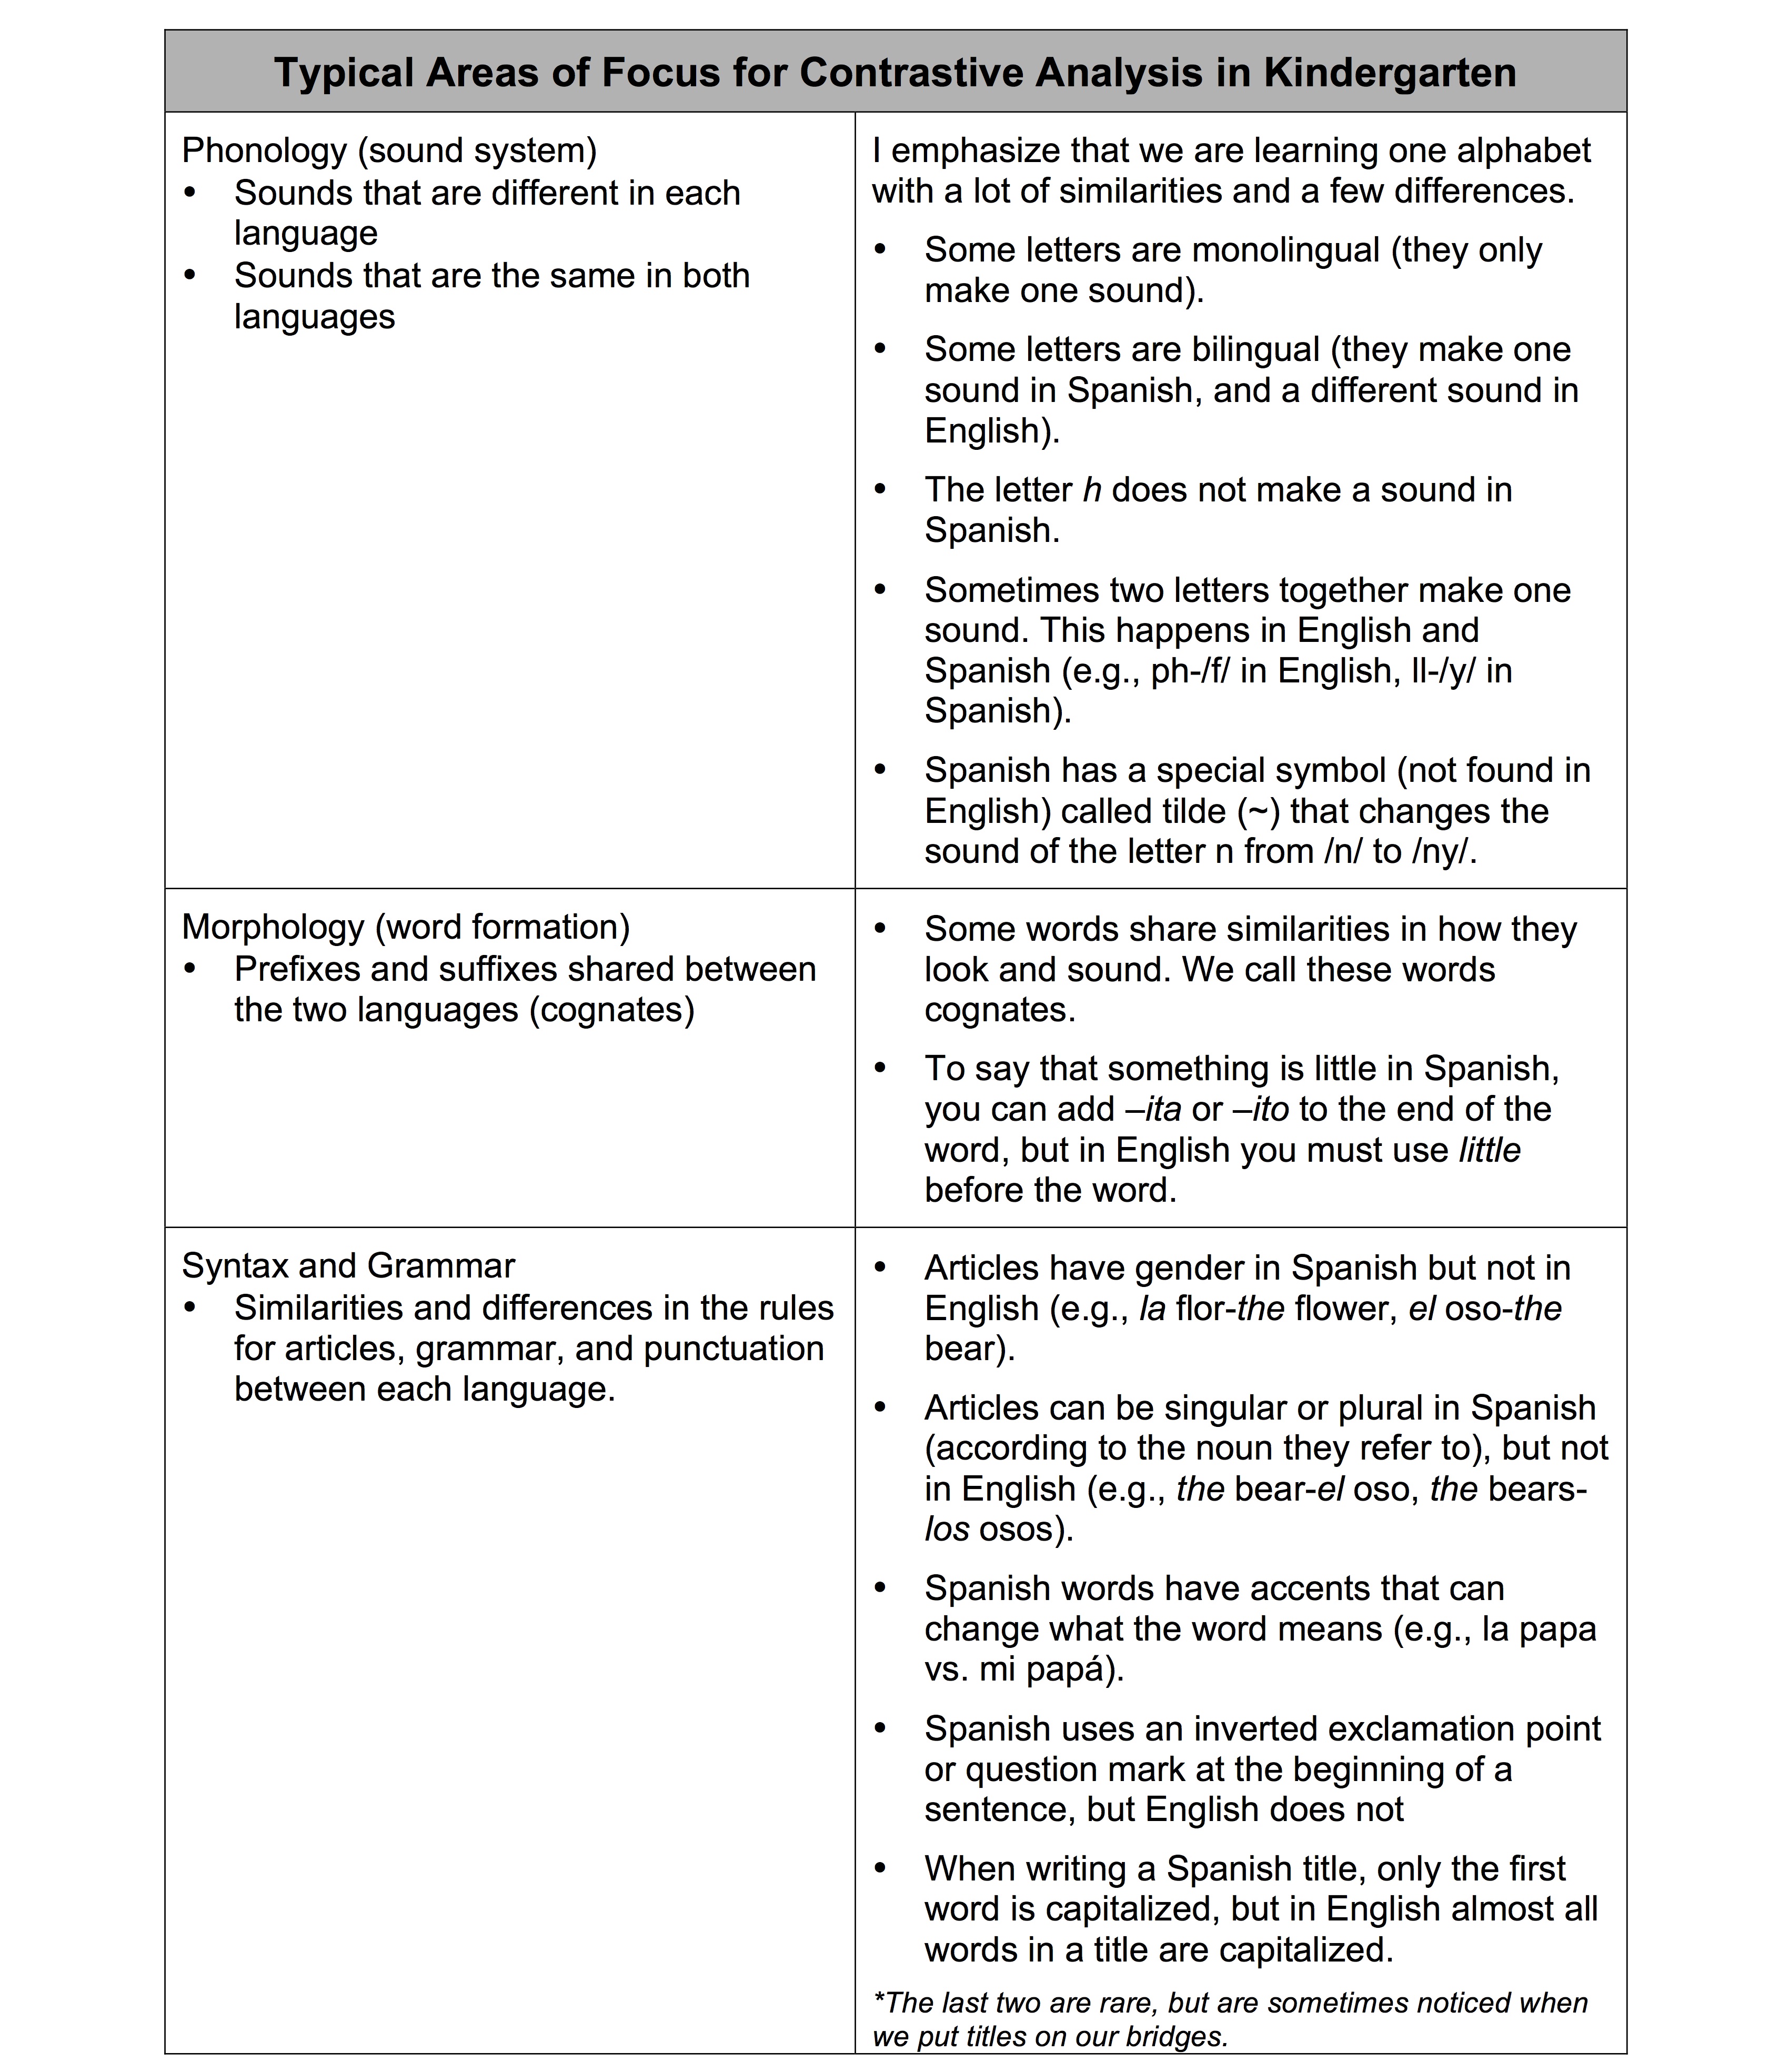
I look at the lists I have generated and consider what similarities and differences I notice between the two languages. I frame my analysis by looking through the lenses of phonology (sound system), morphology (word formation), syntax and grammar (sentence structure), and pragmatics (language use). In my experience, kindergarteners most often notice and integrate knowledge of similarities and differences in letter sounds (phonology), cognates (morphology), articles, punctuation, and accents (syntax and grammar). Connections between languages in the area of pragmatics are rare in my kindergarten classroom because they require more extended text, and my Bridges are primarily done with lists or diagrams. Kindergartners catch on quickly to cognates and they become very popular once students understand the ‘looks similar + sounds similar’ criteria that defines a cognate in a developmentally appropriate way for a 5-year-old. After I identify the possibilities for contrastive analysis that I see, I choose one or two that are most salient and lend themselves to emphasis for this Bridge.
The last step of my planning process is to decide on the format I will use for the chart. I use both side-by-side lists and diagrams with my students, but depending on the topic one is typically more appropriate than the other. If I use a list, I always plan to include a visual representation of each word next to it. Often I draw pictures, but sometimes I use clipart. Drawing is the preferred method because all you need is a marker, and with drawing you can be responsive to anything a student says on the spot. I try to maintain consistency in the visual representations so that the same drawing or clipart is used for a particular word across all the charts we create for a particular unit (e.g., word banks or group writing). Providing visual support for text is paramount in kindergarten, especially with a side-by-side list. Although the focus of the Bridge is metalinguistic analysis, comprehensible input is the foundation on which we are building that metalinguistic awareness. For students who cannot read, a list of words is meaningless unless it has some visual support.

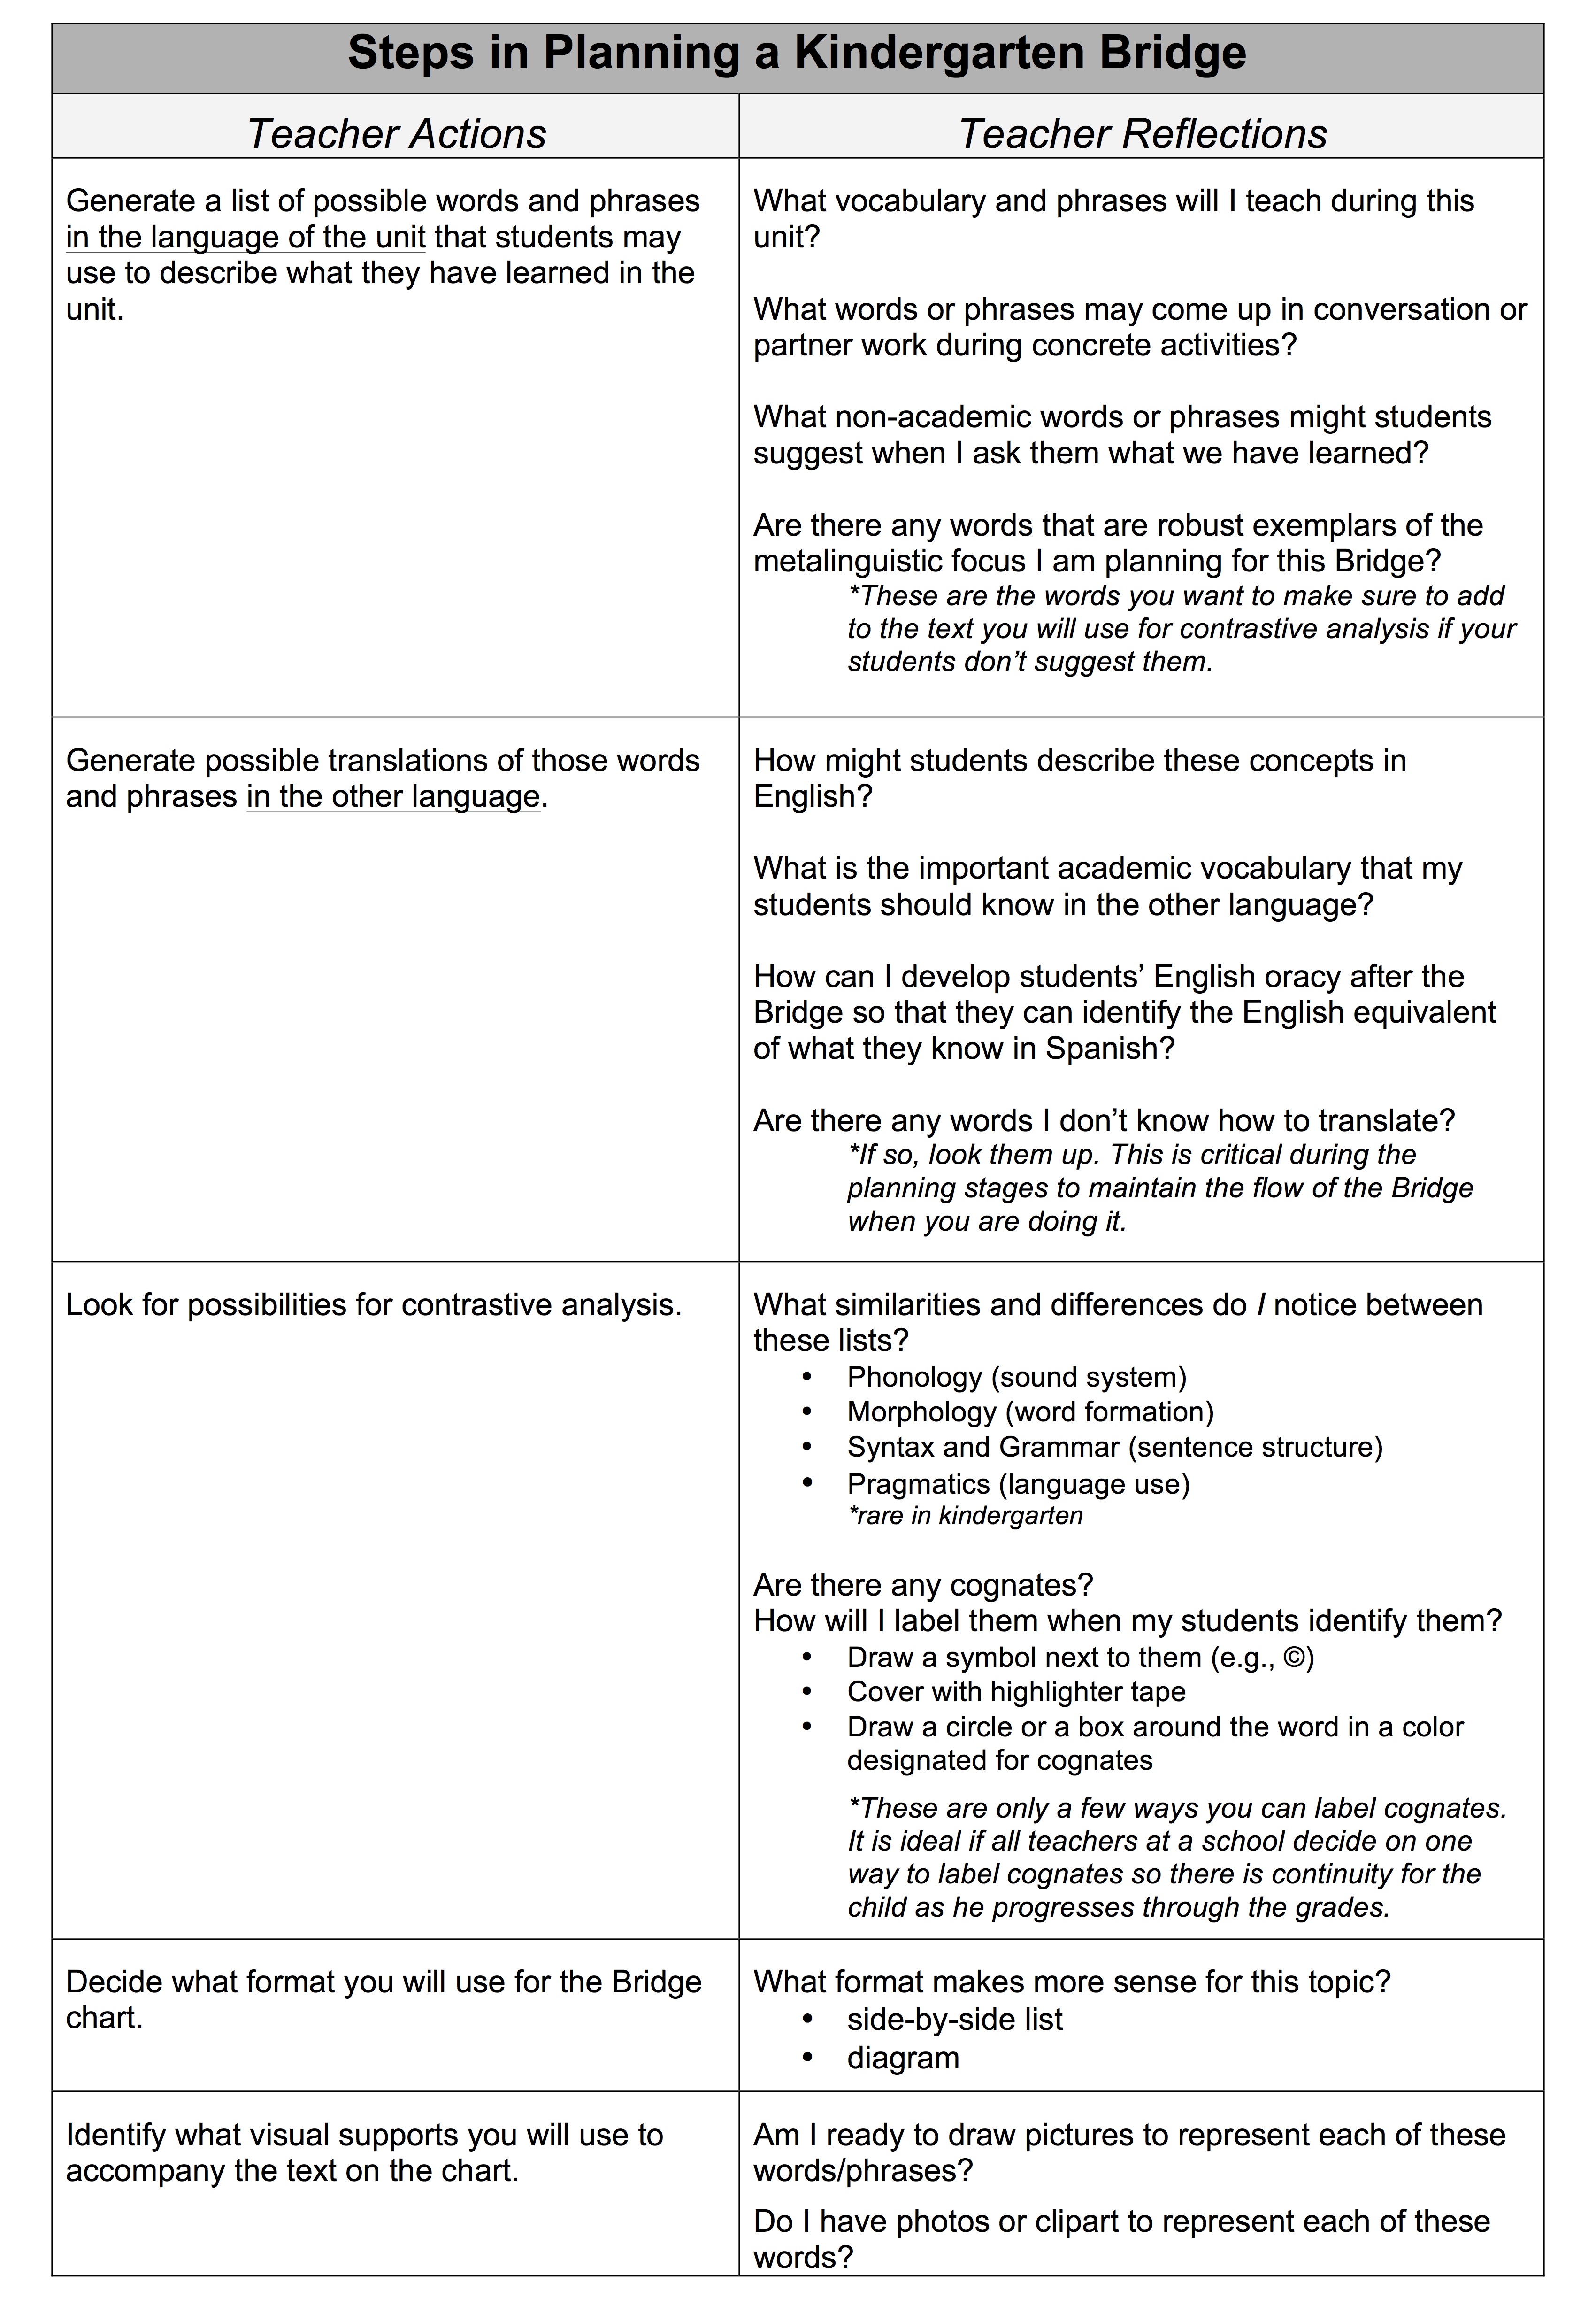
One important caveat to this planning process is that students will not say every word or phrase that I identified as important learning for this unit. Nor will they notice every similarity and difference that I identified when I planned the Bridge. Everything from a unit does not need to be bridged! The list must only have enough material to support contrastive analysis, and what students generate on their own is typically enough. There are times when I suggest a word or two that is either a particularly robust example of a certain linguistic feature or is important academic vocabulary that my students should know. I do the TPR or point to a picture to encourage a student to say that certain word—this method of adding a word keeps the Bridge as student-driven as possible.
Doing a Bridge with Kindergarteners
On the day we are going to do a Bridge, I add a card to the daily schedule board that my students refer to throughout the day.

My school uses the Daily 5 as an organizing structure for the literacy block. This structure alternates periods of independent work (while the teacher works with small groups) and whole group mini-lessons. I use the Bridge as one of my mini-lessons during the literacy block only on the weeks when we have reached the end of a unit (which is when the Bridge happens). Here is a description of the procedure I use to do a Bridge in my kindergarten classroom:
Step 1: Ask students what they have learned about the topic in the language that the unit was taught.
This is a great opportunity for students to summarize their learning or highlight the salient facts they have learned. I find it very helpful to have any realia, photos or other visuals, word banks, group writing charts, projects, and student work related to the unit in the immediate environment so students can refer to them. To give students an opportunity to work on their oral language, I have also distributed realia or photographs to students and had them sit with partners to discuss what they are holding/looking at before asking them to share with the whole group.
Depending on their language level, students may respond to this question with TPR, single words, phrases, or complete sentences. Regardless of how a concept is shared with the group, I try to engage all of them in doing the TPR and a choral recitation of the word or phrase before I write it down. This process is repeated until we run out of room on the chart paper. I make sure to plant any key words that may not have come up when I notice that space is running out. At the end of this step, we have a list or a diagram with words/phrases in the language the unit was taught in with drawings or pictures beside them.
During this first step, I have my green necklace on (for Spanish). Then I physically walk over to the other side of the chart and trade my green necklace for the purple one (for English). I ask my students to stand up and march in place as I walk from one side of the easel to the other so we are all “crossing the bridge.”
Step 2: Ask students how they would express those concepts in the other language.
Sometimes this part is a collaborative effort between the students and the teacher. Students’ ability to contribute to this part of the process depends on the topic and on students’ previous experience with the topic in English, either at home or in preschool. Regardless of how the translations emerge, I engage all students in the same process. We use the same TPR that we used in Spanish and chorally recite the new word/phrase before I write it. This process is repeated until we have translated all the words/phrases. At the end of this step, we have all that we need to engage in contrastive analysis.
Step 3: Ask students if they notice any cognates.
In the early days of doing Bridges, I find that students most readily participate when I ask them if they see any cognates (after they understand the ‘looks similar-sounds similar’ criteria). In those early days, it is also fruitful to engage students in a guided process of looking at pairs of words and saying them to see if they look similar and sound similar. Sometimes students will identify false cognates, and I think that is okay. If they are applying the criteria that they understand correctly, I don’t belabor the point. There will be a future time when they learn about false cognates. For now, I am satisfied with their ability to compare words in two languages and to apply criteria to determine if they are cognates.
Step 4: Ask students if they notice anything that is the same or different between the two sides.
I find that it is helpful at the beginning to ask this question more specifically (e.g., Do you notice any letters that make the same sound in English and in Spanish?) around a particular feature. Another good strategy to tune students in to a particular similarity or difference is to write things in a way that invites comparison. For example, if I want students to notice that articles in Spanish show number, I might number the drawings or highlight the ‘s’ at the end of both the article and the noun as the Bridge below shows.

It is important to note that I am not teaching students this—it is not a lesson on number in articles in Spanish. Rather, through my highlighting, I am providing a scaffold to help students tune in to this feature. This is an important distinction to make. I believe that this kind of scaffolding gradually falls away as students progress through the elementary grades, but that it is a vital part of doing a Bridge with our youngest students.
Step 5: Summarize the points of the metalinguistic focus for this Bridge.
I typically end the Bridge by selecting a few examples that demonstrate one or two foci that I want to emphasize. Early on, I will describe the similarities and differences, but eventually I point to something we have circled or marked and ask students “What did we notice here?” The chart below lists the most common areas of focus for contrastive analysis that have emerged in my classroom.
There are several approaches to completing the five steps I use to do a Bridge with my students. It is possible to do all five steps at once (with lots of opportunities for moving around to find and sit with partners or to do TPR). This approach requires a longer block of time, so it does not fit nicely with the brief amount of time usually allocated for a mini-lesson; thus, it requires some flexibility with scheduling the literacy block. Another approach is to do steps 1-2 during a mini-lesson 1 day and steps 3-5 during a mini-lesson the next day. If the literacy block is interrupted by a special (e.g., music), it is also possible to do steps 1-2 in the morning half of the literacy block and steps 3-5 in the afternoon half of the literacy block. The nice thing about the last two approaches is that it gives me an opportunity to look at what students have actually come up with and think about what the salient comparisons are. It’s the same process I use when planning for the bridge using my own lists, but instead of guessing what students might say, I have what they actually said right in front of me.
After the Bridge: Extension Activities
During the Bridge, students were reminded or introduced to the words and phrases needed to talk about the topic in the other language. For the Bridge, these translations functioned as a source for the development of metalinguistic awareness through contrastive analysis. Once that purpose has been met, students need to have opportunities to use those words and phrases in meaningful ways. Extension activities serve as the context in which students can listen, speak, read and write about the unit topic in the other language.
Extension activities are literacy activities and I have found they are a good way to use the 20% of my day that is allocated to instruction in English (because our language plan in kindergarten is 80% Spanish and 20% English). Extension activities are the perfect context to read aloud beloved stories in English that are related to your unit (listening, reading) or to collaborate with students in the non-dual language classrooms. For example, students can create models or write books (writing) about the unit topic and then share them with students from other classrooms (speaking).
So, after all of this work planning for and implementing a Bridge, what do students really understand about the two languages they are learning? I wondered about this very thing and decided to ask my students. In my next blog, you will have a chance to hear some of my students’ developing metalinguistic knowledge in their own words, as well as how my students’ replies have reaffirmed the powerful role of this strategy for our youngest emerging bilinguals.